- REVIEWS
Product Category Product Category 
Brands Brands - VIDEOS
- CARP SCENE
- WIN
Anatomy Of A Carp Rig | Dave Gaskin's Munnie Rig
As an incredibly fastidious angler I don’t feel like you can ever feel fully satisfied that you have everything perfected, especially when it comes to rigs! It is always fun to tinker and try to improve upon something that has already proven many times to be a hugely successful and effective rig.
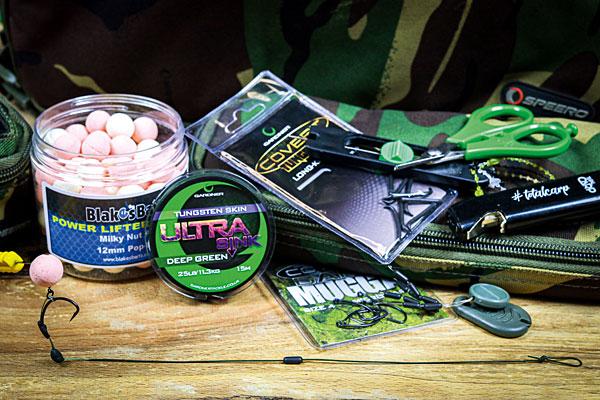
With this mind-set, I wanted to try and take great attributes from a couple of thoroughly proven rigs, combining them into one. Without trying to re-invent the wheel, the thought of amalgamating two all-time classics, the multi rig and the Ronnie rig, was far too appealing to ignore! The primary features and components used in the construction of the munnie rig are a supple braided D-section that the hook bait can be mounted on, a kicker to hold the D in place and a low-lying pop-up.
As opposed to the multi rig, which generally has the skin still on the hookl ink used to form the D section, the original Ronnie rig consisted of a uncoated braided D-section that the hook bait was mounted upon. By creating this in the style of the multi rig and holding it in place using a kicker, it formed a slip D feature on the rig.

One of the advantages of this arrangement is that just like the multi rig, the munnie can give me feedback in such an instance where I get a twitchy take that is not converted into a full-blooded take. The tell-tale being that D-section will normally be pulled down tighten to the eye, meaning that a fish has undoubtedly visited my baited area and been pricked. If this does occur it can help me decide whether I need to introduce more bait or not. The hook pattern I favour for this rig is one that is synonymous with the Ronnie rig and slip-D – the Gardner Covert Dark Mugga hook. This pattern has an ultra-sharp hook point and with the aggressive in-turned eye it helps to flip the hook over and penetrate the bottom lip.
The ability to change the hook with such ease is also a major factor to consider and a big advantage if you’re doing short sessions. While trying to get the rig bang on the money there is always the chance of turning the hook point over; if that happens you can swap hooks by simply sliding the kicker off the hook, so the hook link can slide over the hook and a brand new one slid on, without the need of tying a whole new hooklink. Gawd bless the multi rig aspect of the rig’s design!
With the massive range of options available in terms of different hook link materials that can be used to tie this rig, it is hugely versatile and works superbly whether it is with a short stiff hook link such as Ultra Skin Stiff fished over a clean hard spot, or perhaps a softer, subtler material fished over low lying debris. I always have a few of these tied up in the rig wallet ready for action!
Step-By-Step: Tying Dave Gaskin's Munnie Rig
 1. Cut off a 12in length of Ultraskin
 2. Strip the last three to four inches of coating.
 3. Tie a 3cm figure of eight loop, leaving 5mm before the coating starts.
 4. Pass the loop through the eye of a Mugga hook...
 5. ...then mount a micro hook ring swivel.
 6. Pass the loop back over the hook in a multi-rig fashion.
 7. Trim a hook kicker down to form a gentle curve.
 8. Pass it over the eye of the hook to trap the slip-D in place.
 9. Mount your chosen hookbait using the floss and blob method.
 10. Mould a lump of putty around the knot to counterbalance the pop-up.
 11. The addition of a sinker will keep everything pinned down.
 12. Form a small loop to attach to your chosen lead setup.
- Log in or register to post comments


| Gear Reviews | More Gear Reviews | News Articles | Venues Videos | Shop | Subscriptions | Resources |